
How to Schedule an Email in Outlook Just Like a Pro
Explore this post with:
Timing matters even in professional life. Sometimes, we wish that this particular email should be delivered to our clients without delay, but we forgot to send it. By choosing Microsoft Outlook’s schedule feature, you do not need to worry about the specific time to share it. You can effortlessly manage the reminders, strategic communication, and much more. However, using this feature, you need to understand how to schedule an email in Outlook.
This step-by-step guide will only focus on how do you schedule an email in Outlook in just a few clicks. After understanding this concept, you will definitely use the advanced features of scheduling messages in Outlook. Before jumping towards the steps, we would like to highlight the characteristics that will help you further.
6 Features of Outlook for Effective Email Scheduling
Microsoft Outlook provides numerous advanced features that will help to maintain workflows in an effective form.
-
- Snooze Emails: If you want to temporarily remove an email, you can snooze it. After some time, you can review the emails that will help you organize your busy inbox.
- Delay or Schedule Send: By opting for this feature, you can effortlessly send or delay the message or an email at an appropriate time.
- Out of Office Replies: When you choose the OOF(Out-of-Office) feature, it simply indicates that you are not available during working hours. In other words, you have taken a leave for the specific day.
- Time Zones: Microsoft Outlook allows users to maintain an effective workflow by delivering the messages within a particular period of time.
-
- Contact Groups (Distribution Lists): When you create your desired and favourite contact groups, it simplifies sending your targeted emails to numerous recipients. In addition, it allows you to add recipients to a group and share with your list as a single email.
- Email Templates: If you have already created email templates, you can save your repeatedly used email content for reutilization. As a result, it will lead you to save your time and make sure that there will be consistent messaging across multiple emails.
Prerequisites Before You Schedule
Follow the below takeaways to know how to schedule an email in Outlook.
-
- Must have a proper and stable internet connection for scheduling your desired emails.
- Update your Outlook versions. Otherwise, you will face difficulties while scheduling.
- You must configure your MS Outlook account with an Office 365 account.
How to Schedule an Email in Outlook?
Here, we will elaborate on four different approaches that will guide you to learn how you can effortlessly schedule your email in MS Outlook.
#1. Send Automatic Emails in Outlook Through Web
Web Outlook is easy to use, but it may take a little time to find the right buttons. For example, “delivery delay” is now called “Schedule Send.” Here, we will provide you the simple steps on scheduling an email in Outlook:
Steps on How to Schedule Your Email:
- To begin with, start a new email. Add your recipients, subject, and message.
- Next to the Send button, click the downward arrow (⌄). Choose “Schedule send.”
- Select when you desire to convey your email. Further, click Send.
- You do not need to worry about sharing the message without your consent.
Do You Want to Send It Now?
Follow these steps to send your targeted email.
- Firstly, go to Drafts.
- Then, open your scheduled email.
- Tap the Edit icon.
- Click “Send now.”
Your email will send immediately.
#2. Scheduling Emails in Classic Outlook
Still using Classic Outlook at work? No problem! The following are a few simple steps for you to easily schedule emails:
- To begin the first step. Launch the Outlook account and prepare an email.
- Next step is the To section, the subject of the email, and then your message.
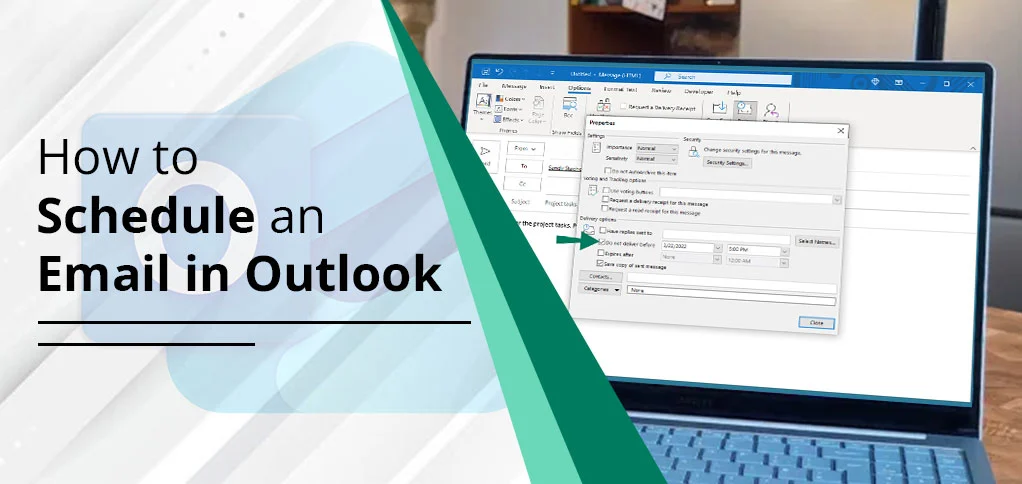
- Move your cursor towards the top and click the Options tab.
- Now, click on Delay Delivery. A small window will pop up.
- Subsequently, check the field “Do not deliver before” and then specify the date and time to send your mail.
- Click Close, then hit Send.
From these steps, we hope you got your answer on how do I delay sending an email in Outlook.
#3. Optimize Email Scheduling in New Outlook
Optimizing emails in the new Outlook is easy. Here’s how you can do it. After reading this, you will get an answer on how to schedule an email in Outlook.
Working on How to Schedule an Email in Outlook:
- Open Outlook and click New Email. Add who you’re sending it to, the subject, and your message.
- Instead of clicking Send, click the small arrow (⌄) beside it.
- Click Schedule Send in the menu.
- Choose a time from the options, or set a Custom time.
- Click Send.
Do You Want to Change the Time?
You can change the time or send the email right away:
- Go to Drafts
- Open the email
- Click the Edit (pen) icon
- Change the time or send it now
#4. Schedule an Email to be Sent in Outlook on Mac
Do you want to send an email later instead of now? Outlook on Mac lets you do that with a feature called Schedule Send.
Follow these quick steps:
- Click New Email and write your message.
- Type the email address in the To field.
- Click the small arrow next to “Send.”
- From the menu, click Schedule Send.
- Opt for that when you wish the targeted email should be sent.
- Outlook will send your email at that time. It will stay in Drafts until then.
Tip: Your Mac doesn’t need to stay on. Outlook will send the email at the right time — even if it’s closed.
Common Mistakes When Scheduling Emails in Outlook
There are a few key points that you must avoid when you are getting to know how to schedule an email in Outlook.
-
- Ignoring the Draft Folder: Before moving ahead, you must cross-verify your Drafts section. As you know, the scheduling messages come under the Draft folder.
- Forgetting to Use “Schedule Send”: If you forget to press the Schedule Send button, it will lead that the desired email will not be received at an appropriate time.
- Skipping the Follow-Up Flags and Reminders: Opt for reminders and follow-up flags to assist you in tracking necessary emails and deadlines.
How to Send Recurring Emails in Outlook?
After understanding how to schedule an email in Outlook and its common mistakes, we are moving ahead to the approach of recurring emails. Outlook doesn’t let you automatically send the same email every year, but you can set it up using Office 365. Here’s how:
Step 1: Create and Save Your Email
- Open Outlook. Click New Email.
- Thereafter, write your email, add the recipient, and the subject.
- Next, click Options and then Delay Delivery.
- Subsequently, check “Do not deliver before” and choose a date and time (e.g., next Thursday morning).
- Further, click Close.
- Then, click File > Save As and save the email as a template.
- Close the email.
Step 2: Set a Yearly Reminder
- Open your Outlook Calendar. Click New Event.
- Next, name the event, like “Send Yearly Email”.
- Now, set the date and time (e.g., the first Thursday of the year).
- Then, click Recurrence and select Yearly.
- Click OK.
- Attach the saved email template. Save the event.
The End Verdict!
This comprehensive guide on how to schedule an email in Outlook has reached its end. Here, we have gone through multiple sections, including sending recurring emails. From the starting, we elaborated on the features of scheduling Outlook emails. After that, we provided you with several solutions. Then, we discussed some tips that you must keep in your mind. Last but not least, we hope this guide will prove to be useful shortly.
FAQs
We assist you at every step, including answering some of the common questions you might have.
Q 1. Is it possible to schedule my emails regularly in Outlook?
Of course, it is! You just need to opt for the “Recurrence” option. In this option, you will make your own choice whether you want to send emails on a daily basis, weekly, or monthly.
Q 2. Does MS Outlook have a scheduler?
You must have an Exchange Outlook or Office 365 account. Your account should be connected to MS Outlook. After this, you will be able to use Room Finder and Scheduling Assistant in order to set up the meetings that you need.
Q 3. Can you edit your scheduled email in MS Outlook?
First, you are required to unschedule your scheduled email. After that, you can easily edit your targeted email in Microsoft Outlook.